안드로이드에서 FCM 푸시 Push 알림을 받는 방법 입니다.
1. Firebase Cloud Messaging
Firebase 의 프로젝트 생성 및 앱 추가를 합니다.
https://eunoia3jy.tistory.com/129
[Android/Firebase] Firebase 프로젝트 생성 및 앱 추가
안녕하세용! 안드로이드 앱에서 Firebase 를 활용하기 위해 프로젝트를 생성하고 앱을 추가 하는 방법입니다. 먼저 Firebase 콘솔창으로 이동하여 로그인 해주세요~ https://console.firebase.google.com/?hl=ko..
eunoia3jy.tistory.com
Firebase 클라우드 메시징 문서를 참고하였습니다.
https://firebase.google.com/docs/cloud-messaging?hl=ko
Firebase 클라우드 메시징
Firebase 클라우드 메시징(FCM)은 무료로 메시지를 안정적으로 전송할 수 있는 교차 플랫폼 메시징 솔루션입니다.
firebase.google.com

클라우드 메시징 테스트는 아래 try this API 를 통해 진행하였습니다.
https://firebase.google.com/docs/reference/fcm/rest/v1/projects.messages/send
Method: projects.messages.send | Firebase
firebase.ml.naturallanguage.translate
firebase.google.com
아래 json 형태로 전송하였습니다.
{
  "message": {
    "token": "토큰값",
    "data": {
      "type": "NORMAL/EXPANDABLE/CUSTOM",
      "title": "Test Push 제목",
      "message": "Test Push 메세지"
    }
  }
}
2. 소스 코드
작성한 파일 목록 입니다.
1. build.gradle(:app)
2. AndroidManifest.xml
3. MyFirebaseMessagingService.kt
4. NotificationType.kt
5. MainActivity.kt
6. activity_main.xml
7. view_custom_notification.xml
2-1. build.gradle(:app)
build.gradle(:app) 의 하단 dependencies {} 안에 firebase messaging 에 대한 라이브러리를 사용하기 위해
implementation 'com.google.firebase:firebase-messaging-ktx' 를 추가해줍니다.
2-2. AndroidManifest.xml
FirebaseMessagingService 를 AndroidManifest 의 application 에 service 로 추가해줍니다.
<?xml version="1.0" encoding="utf-8"?>
<manifest xmlns:android="http://schemas.android.com/apk/res/android"
    package="com.eun.mytest">

    <uses-permission android:name="android.permission.INTERNET" />
    <application
        android:allowBackup="true"
        android:icon="@mipmap/ic_launcher"
        android:label="@string/app_name"
        android:roundIcon="@mipmap/ic_launcher_round"
        android:supportsRtl="true"
        android:theme="@style/Theme.MyTest">
        <activity android:name="com.eun.mytest.MainActivity">
            <intent-filter>
            	<action android:name="android.intent.action.MAIN" />
              	<category android:name="android.intent.category.LAUNCHER" />
            </intent-filter>
        </activity>
        <service
            android:name=".MyFirebaseMessagingService"
            android:exported="false">
            <intent-filter>
                <action android:name="com.google.firebase.MESSAGING_EVENT" />
            </intent-filter>
        </service>
    </application>

</manifest>
2-3. MyFirebaseMessagingService.kt
FirebaseMessagingService 를 상속하여 구현한 MyFirebaseMessagingService.kt 입니다.
class MyFirebaseMessagingService : FirebaseMessagingService() {
    companion object {
        const val TAG = "MessagingService"
        private const val CHANNEL_NAME = "Push Notification"
        private const val CHANNEL_DESCRIPTION = "Push Notification 을 위한 채널"
        private const val CHANNEL_ID = "Channel Id"
    }

    /* 토큰 생성 메서드 */
    override fun onNewToken(token: String) {
        super.onNewToken(token)
    }

    /* 메세지 수신 메서드 */
    override fun onMessageReceived(remoteMessage: RemoteMessage) {
        super.onMessageReceived(remoteMessage)
        Log.d(TAG, "onMessageReceived() - remoteMessage : $remoteMessage")
        Log.d(TAG, "onMessageReceived() - from : ${remoteMessage.from}")
        Log.d(TAG, "onMessageReceived() - notification : ${remoteMessage.notification?.body}")

        val type = remoteMessage.data["type"]?.let { NotificationType.valueOf(it) } ?: kotlin.run {
            NotificationType.NORMAL  //type 이 null 이면 NORMAL type 으로 처리
        }
        val title = remoteMessage.data["title"]
        val message = remoteMessage.data["message"]

        Log.d(TAG, "onMessageReceived() - type : $type")
        Log.d(TAG, "onMessageReceived() - title : $title")
        Log.d(TAG, "onMessageReceived() - message : $message")

        sendNotification(type, title, message)
    }


    /* 알림 생성 메서드 */
    private fun sendNotification(
        type: NotificationType,
        title: String?,
        message: String?
    ) {
        val notificationManager =
            getSystemService(Context.NOTIFICATION_SERVICE) as NotificationManager

        //Oreo(26) 이상 버전에는 channel 필요
        if (Build.VERSION.SDK_INT >= Build.VERSION_CODES.O) {
            val channel = NotificationChannel(
                CHANNEL_ID,
                CHANNEL_NAME,
                NotificationManager.IMPORTANCE_DEFAULT
            )
            channel.description = CHANNEL_DESCRIPTION
            notificationManager.createNotificationChannel(channel)
        }

        //알림 생성
        NotificationManagerCompat.from(this)
            .notify((System.currentTimeMillis()/100).toInt(), createNotification(type, title, message))  //알림이 여러개 표시되도록 requestCode 를 추가
    }


    /* 알림 설정 메서드 */
    private fun createNotification(
        type: NotificationType,
        title: String?,
        message: String?
    ): Notification {

        val intent = Intent(this, MainActivity::class.java).apply {
            putExtra("notificationType", " ${type.title} 타입 ")
            addFlags(Intent.FLAG_ACTIVITY_SINGLE_TOP)
        }
        val pendingIntent = PendingIntent.getActivity(this, (System.currentTimeMillis()/100).toInt(), intent, FLAG_UPDATE_CURRENT)  //알림이 여러개 표시되도록 requestCode 를 추가

        val notificationBuilder = NotificationCompat.Builder(this, CHANNEL_ID)
            .setSmallIcon(R.drawable.ic_baseline_notifications_active_24)
            .setContentTitle(title)
            .setContentText(message)
            .setPriority(NotificationCompat.PRIORITY_DEFAULT)
            .setContentIntent(pendingIntent)  //알림 눌렀을 때 실행할 Intent 설정
            .setAutoCancel(true)  //클릭 시 자동으로 삭제되도록 설정

        //type 에 따라 style 설정
        when (type) {
            NotificationType.NORMAL -> Unit
            NotificationType.EXPANDABLE -> {
                notificationBuilder.setStyle(
                    NotificationCompat.BigTextStyle()
                        .bigText("$message \n 😀 😃 😄 😁 😆 😅 😂 🤣 🥲 ☺️ 😊 😇 🙂 🙃 😉 😌 😍 🥰 😘 😗 😙 😚 😋 😛 😝 😜 🤪 🤨 🧐 🤓 😎 🥸 🤩 🥳 😏 😒 😞 😔 😟 😕 🙁 ☹️ 😣 😖 😫 😩 🥺 😢 😭 😤 😠 😡 🤬 🤯 😳 🥵 🥶 😱 😨 😰 😥 😓 🤗 🤔 🤭 🤫 🤥 😶 😐 😑 😬 🙄 😯 😦 😧 😮 😲 🥱 😴 🤤 😪 😵 🤐 🥴 🤢 🤮 🤧 😷 🤒 🤕")
                )
            }
            NotificationType.CUSTOM -> {
                notificationBuilder.setStyle(
                    NotificationCompat.DecoratedCustomViewStyle()
                )
                    .setCustomContentView(
                        RemoteViews(
                            packageName,
                            R.layout.view_custom_notification
                        ).apply {
                            setTextViewText(R.id.tv_custom_title, title)
                            setTextViewText(R.id.tv_custom_message, message)
                        }
                    )
            }
        }
        return notificationBuilder.build()
    }


}
2-4. NotificationType.kt
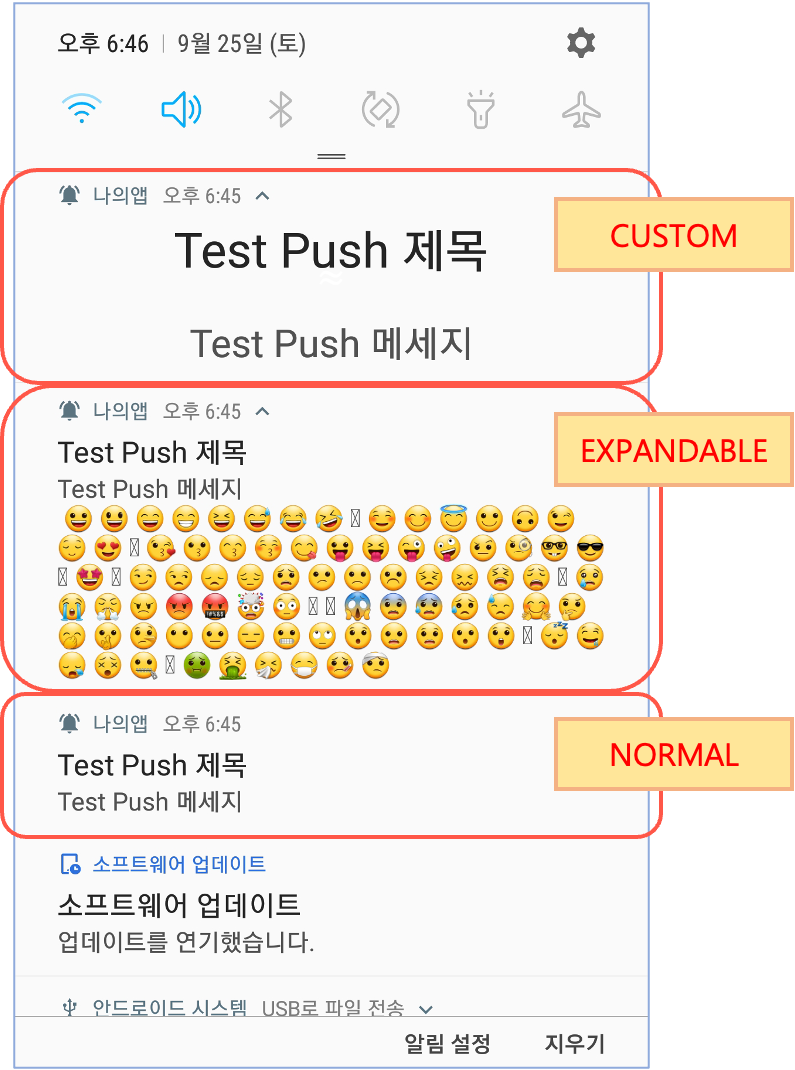
notification 의 3가지 type 종류입니다.
enum class NotificationType(val title: String, val id: Int) {
    NORMAL("일반 알림", 0),
    EXPANDABLE("확장형 알림", 1),
    CUSTOM("커스텀 알림", 3),
}
2-5. MainActivity.kt
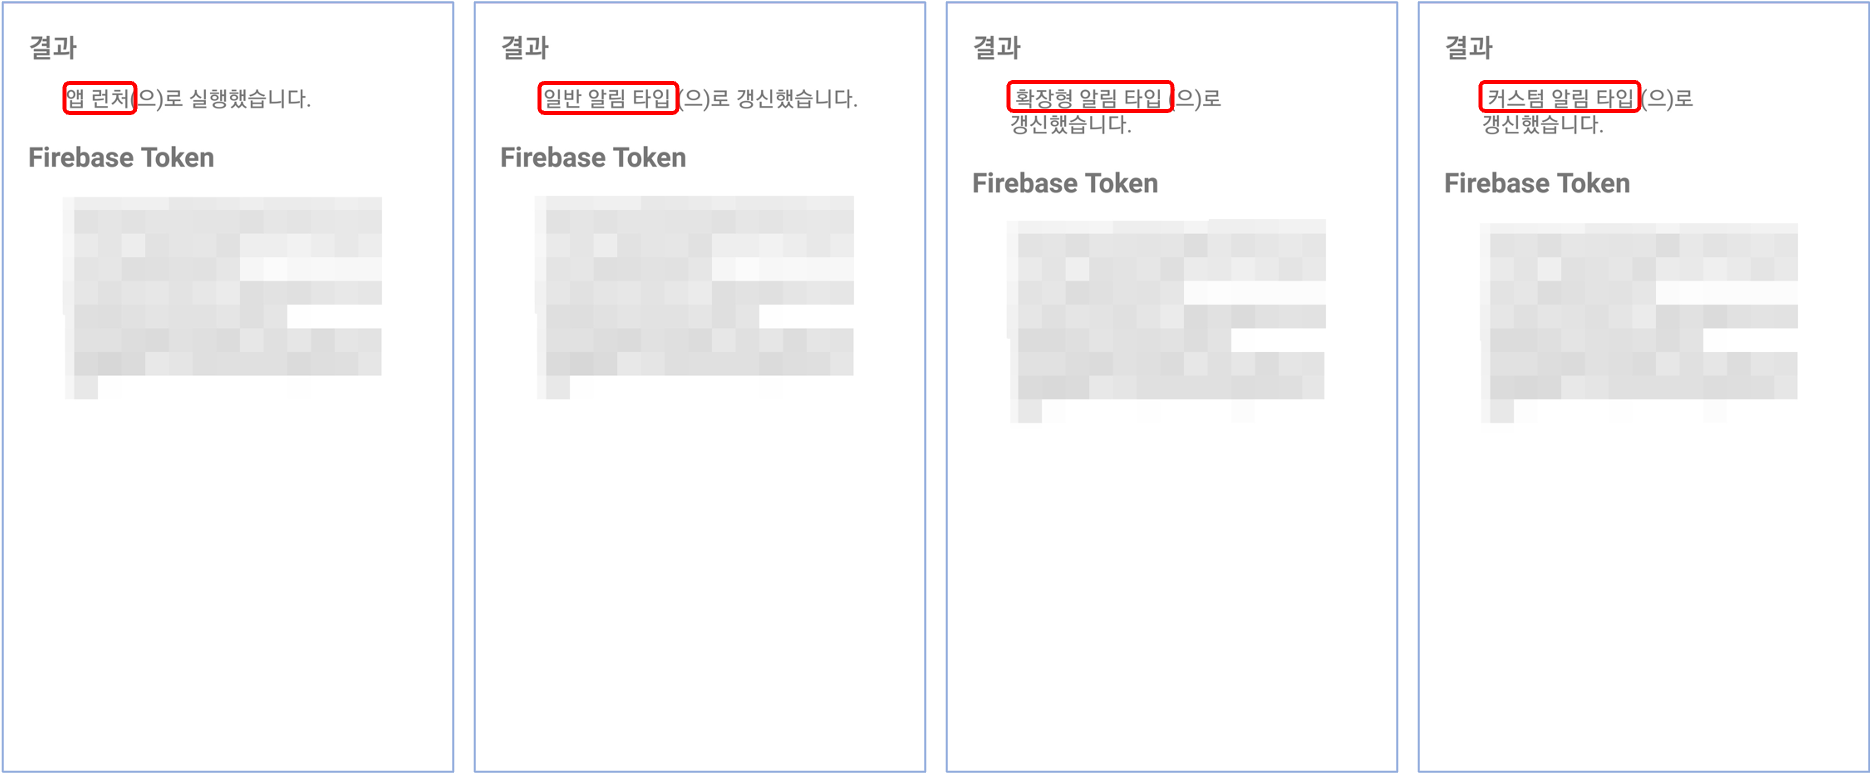
notification 을 클릭 시 MainActivity 에서 ui 를 update 해줍니다.
initFirebase() 에서 token 값을 확인하여 표시해주고,
updateResult() 에서 앱 아이콘을 클릭하여 실행 시 / notification 을 통해 갱신 시 에 따라 tvResult 에 표시해줍니다.
class MainActivity : AppCompatActivity() {
    companion object {
        const val TAG = "MainActivity"
    }

    private val tvResult: TextView by lazy {
        findViewById(R.id.tv_result)
    }

    private val tvToken: TextView by lazy {
        findViewById(R.id.tv_token)
    }

    override fun onCreate(savedInstanceState: Bundle?) {
        super.onCreate(savedInstanceState)
        setContentView(R.layout.activity_main)

        initFirebase()
        updateResult()
    }

    override fun onNewIntent(intent: Intent?) {
        super.onNewIntent(intent)
        setIntent(intent)
        updateResult(true)
    }

    private fun initFirebase() {
        FirebaseMessaging.getInstance().token.addOnCompleteListener { task ->
            if (task.isSuccessful) {
                tvToken.text = task.result
            }
        }
    }

    private fun updateResult(isNewIntent: Boolean = false) {
        //true -> notification 으로 갱신된 것
        //false -> 아이콘 클릭으로 앱이 실행된 것
        tvResult.text = (intent.getStringExtra("notificationType") ?: "앱 런처") + if (isNewIntent) {
            "(으)로 갱신했습니다."
        } else {
            "(으)로 실행했습니다."
        }
    }

}
2-6. activity_main.xml
MainActivity 에 대한 레이아웃입니다.
<?xml version="1.0" encoding="utf-8"?>
<LinearLayout
    xmlns:android="http://schemas.android.com/apk/res/android"
    xmlns:app="http://schemas.android.com/apk/res-auto"
    xmlns:tools="http://schemas.android.com/tools"
    android:layout_width="match_parent"
    android:layout_height="match_parent"
    android:orientation="vertical"
    android:padding="20dp">

    <TextView
        android:layout_width="wrap_content"
        android:layout_height="wrap_content"
        android:text="결과"
        android:textSize="20sp"
        android:textStyle="bold" />

    <TextView
        android:id="@+id/tv_result"
        android:layout_width="match_parent"
        android:layout_height="wrap_content"
        android:layout_marginHorizontal="30dp"
        android:layout_marginTop="15dp"
        android:textSize="16sp"
        tools:text="기본 입니다." />

    <TextView
        android:layout_width="wrap_content"
        android:layout_height="wrap_content"
        android:layout_marginTop="20dp"
        android:text="Firebase Token"
        android:textSize="20sp"
        android:textStyle="bold" />

    <TextView
        android:id="@+id/tv_token"
        android:layout_width="match_parent"
        android:layout_height="wrap_content"
        android:layout_marginHorizontal="30dp"
        android:layout_marginTop="15dp"
        android:text="Loading..."
        android:textIsSelectable="true"
        android:textSize="16sp" />

</LinearLayout>
2-7. view_custom_notification.xml
custom notification 에 대한 레이아웃입니다.
<?xml version="1.0" encoding="utf-8"?>
<LinearLayout
    xmlns:android="http://schemas.android.com/apk/res/android"
    android:layout_width="match_parent"
    android:layout_height="match_parent"
    android:gravity="center"
    android:orientation="vertical">

    <TextView
        android:id="@+id/tv_custom_title"
        style="@style/TextAppearance.Compat.Notification.Title"
        android:layout_width="wrap_content"
        android:layout_height="wrap_content"
        android:text="Title"
        android:textSize="25sp" />

    <TextView
        android:id="@+id/tv_custom_message"
        style="@style/TextAppearance.Compat.Notification"
        android:layout_width="wrap_content"
        android:layout_height="wrap_content"
        android:layout_marginTop="20dp"
        android:text="Message"
        android:textSize="20sp" />

</LinearLayout>
결과 화면
notification 의 type 에 따라 다양한 ui 의 알림을 표시해줍니다.
감사합니다 :)

'📱 안드로이드 Android ~ Kotlin' 카테고리의 다른 글
| [안드로이드/Android] Kotlin/Java 권한 요청 uses-permission (0) | 2021.12.30 |
|---|---|
| [Android/Kotlin] Koin (kotlin 으로 작성된 경량화된 Dependency Injection 프레임워크) (0) | 2021.09.28 |
| [Android/Kotlin] 구글 Google 계정 로그인 연동을 위한 firebase console 설정방법 및 소스코드 (0) | 2021.09.22 |
| [Android/Kotlin] 코루틴 coroutine (0) | 2021.09.21 |
| [안드로이드/Android] 클린아키텍처 Clean Architecture (0) | 2021.09.09 |