안녕하세용! 안드로이드 앱에서 Firebase 를 활용하기 위해 프로젝트를 생성하고 앱을 추가 하는 방법입니다.
먼저 Firebase 콘솔창으로 이동하여 로그인 해주세요~
https://console.firebase.google.com/?hl=ko
로그인 - Google 계정
하나의 계정으로 모든 Google 서비스를 Google 계정으로 로그인
accounts.google.com
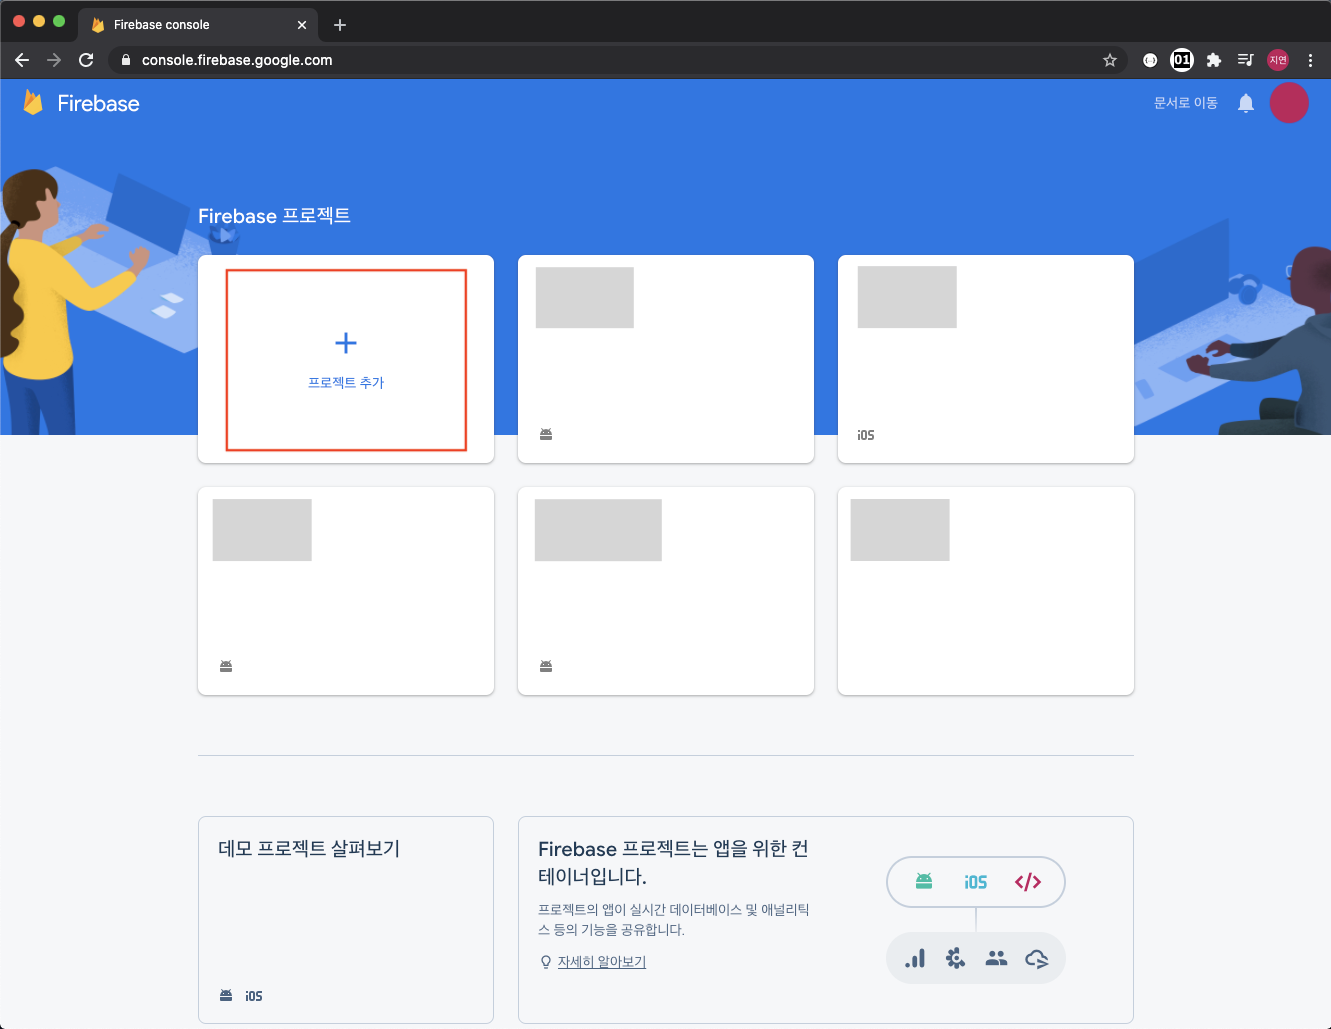
1. Firebase 프로젝트 생성
1-1. 프로젝트 추가 클릭
1-2. 프로젝트 이릅 입력 후 계속 버튼 클릭

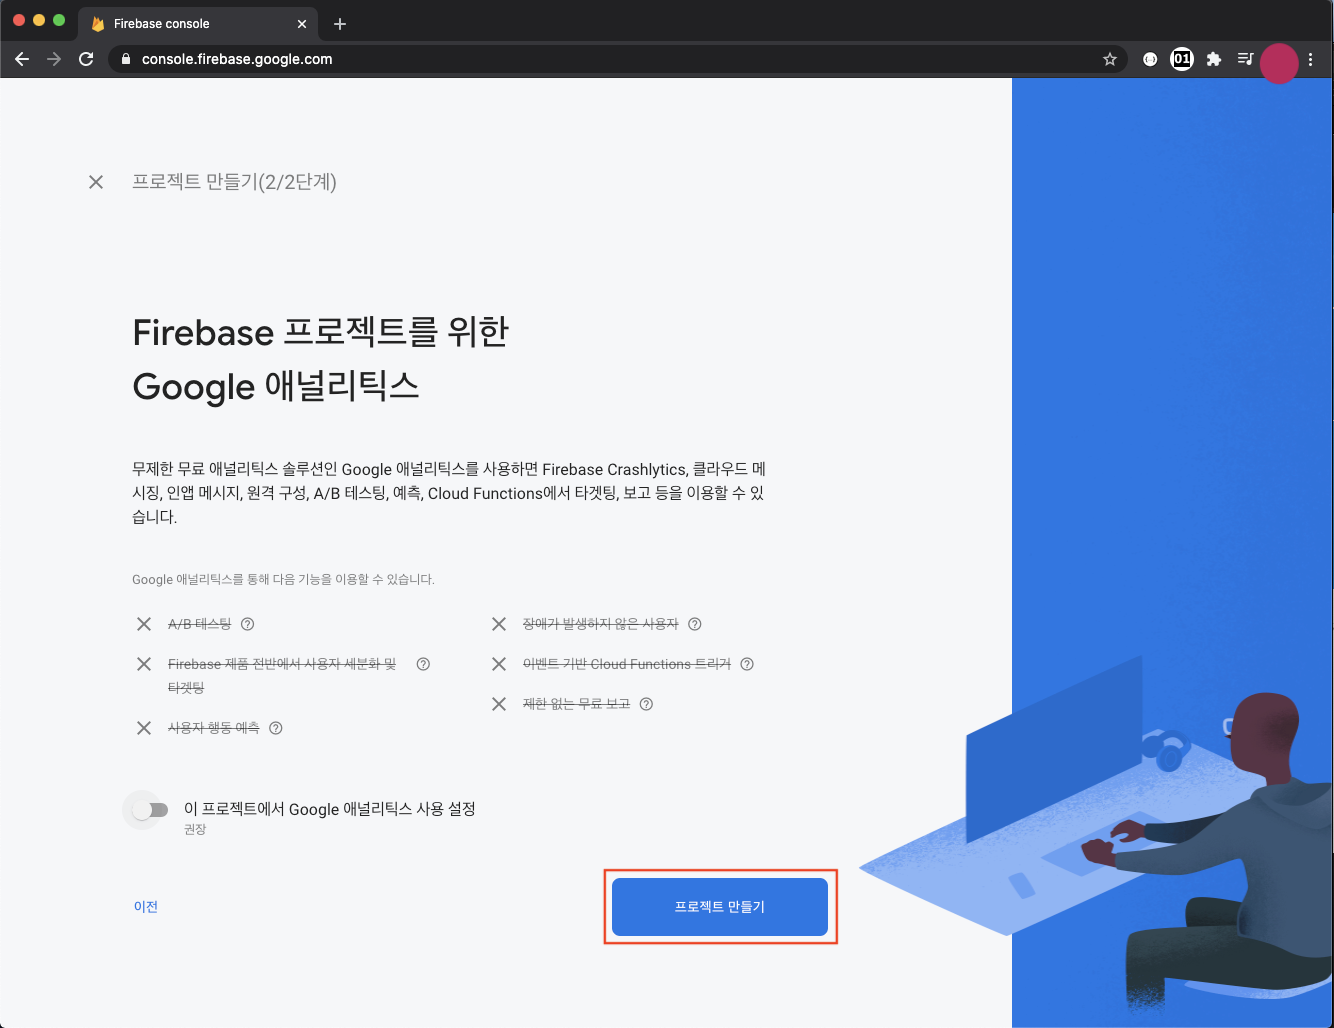
1-3. 프로젝트 만들기 버튼 클릭
1-4. 프로젝트가 만들어지는 동안 잠시 기다립니다.

1-5. 새 프로젝트가 준비되었다고 표시되면 계속 버튼을 클릭합니다.

그러면 Firebase 에 프로젝트가 추가된 것을 확인할 수 있습니다.

2. Firebase 프로젝트에 Android 앱 추가
2-1. 안드로이드 아이콘을 클릭하여 안드로이드 앱 추가를 시작합니다.

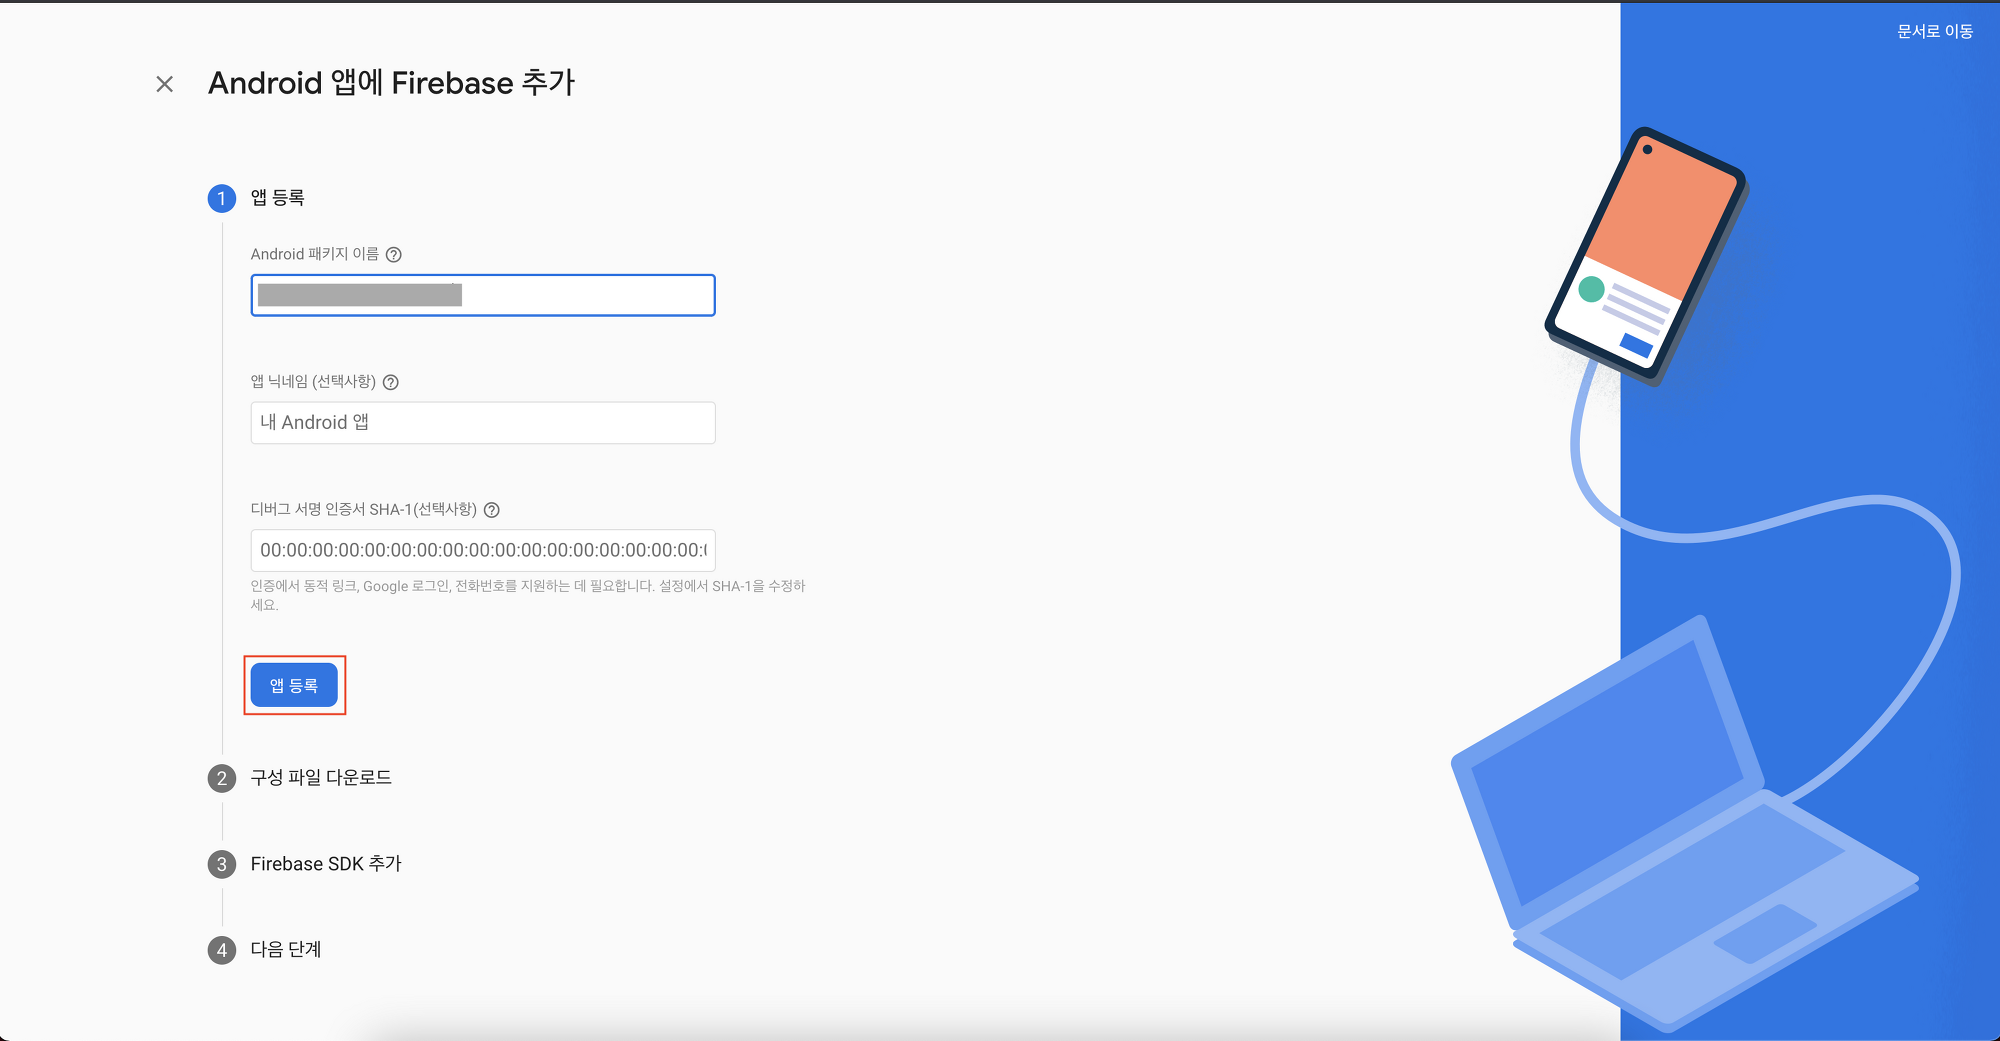
2-2. 앱 등록 - Android 패키지명을 입력하고 앱 등록 버튼 클릭
2-3. 구성파일 다운로드 - google-services.json 을 다운로드 받아서 안드로이드 프로젝트의 해당 경로에 추가해줍니다.

프로젝트/app 밑에 추가해줍니다.

2-4. Firebase SDK 추가 - 프로젝트 수준 build.gradle(<project>/build.gradle) 에 해당 소스를 참고하여 수정합니다.

저의 build.gradle(.) 소스 입니다.
// Top-level build file where you can add configuration options common to all sub-projects/modules.
buildscript {
    ext.kotlin_version = "1.4.32"
    repositories {
        google()
        jcenter()
    }
    dependencies {
        classpath "com.android.tools.build:gradle:4.1.3"
        classpath "org.jetbrains.kotlin:kotlin-gradle-plugin:$kotlin_version"
        classpath 'com.google.gms:google-services:4.3.10'

        // NOTE: Do not place your application dependencies here; they belong
        // in the individual module build.gradle files
    }
}

allprojects {
    repositories {
        google()
        jcenter()
    }
}

task clean(type: Delete) {
    delete rootProject.buildDir
}
2-5. Firebase SDK 추가 - 앱 수준 build.gradle(<project>/<app-module>/build.gradle) 에 해당 소스를 참고하여 수정합니다.

저의 build.gradle(:app) 소스 입니다.
plugins {
    id 'com.android.application'
    id 'kotlin-android'
    id 'kotlin-kapt'
    id 'com.google.gms.google-services'
}

android {
    compileSdkVersion 30
    buildToolsVersion "30.0.3"

    defaultConfig {
        applicationId "com.eun.myshopkotlin"
        minSdkVersion 21
        targetSdkVersion 30
        versionCode 1
        versionName "1.0"

        testInstrumentationRunner "androidx.test.runner.AndroidJUnitRunner"
    }

    buildTypes {
        release {
            minifyEnabled false
            proguardFiles getDefaultProguardFile('proguard-android-optimize.txt'), 'proguard-rules.pro'
        }
    }
    compileOptions {
        sourceCompatibility JavaVersion.VERSION_1_8
        targetCompatibility JavaVersion.VERSION_1_8
    }
    kotlinOptions {
        jvmTarget = '1.8'
    }
}

dependencies {
    implementation "org.jetbrains.kotlin:kotlin-stdlib:$kotlin_version"
    implementation 'androidx.core:core-ktx:1.5.0'
    implementation 'androidx.appcompat:appcompat:1.3.1'
    implementation 'com.google.android.material:material:1.4.0'
    implementation 'androidx.constraintlayout:constraintlayout:2.1.0'
    testImplementation 'junit:junit:4.+'
    androidTestImplementation 'androidx.test.ext:junit:1.1.3'
    androidTestImplementation 'androidx.test.espresso:espresso-core:3.4.0'

    //google firebase
    implementation platform('com.google.firebase:firebase-bom:28.4.0')
}
2-6. 해당 패키지에 google-services.json 구성파일과 build.gradle, build.gradle(:app) 파일을 수정하여 적용 후 앱을 실행해봅니다.
앱이 성공적으로 실행되었으면 설치확인이 완료되고 콘솔로 이동 버튼을 클릭하여 콘솔로 이동합니다.

해당 프로젝트의 콘솔에 안드로이드 앱이 추가된 것을 확인할 수 있습니다.

감사합니다.

'📱 안드로이드 Android ~ Kotlin' 카테고리의 다른 글
| [Android/Kotlin] 코루틴 coroutine (0) | 2021.09.21 |
|---|---|
| [안드로이드/Android] 클린아키텍처 Clean Architecture (0) | 2021.09.09 |
| [Android/Kotiln] 데이터 바인딩 dataBinding 사용하기 (0) | 2021.09.02 |
| [Android/Kotiln] MVVM 적용한 날씨 앱 만들기 (viewBinding, retrofit 사용) (0) | 2021.08.30 |
| [Android/Kotiln] MVVM 적용한 ToDo 앱 만들기 (LiveData) (0) | 2021.08.13 |